March 29th, week 3 of the quarantine in Columbus. I’ve just canceled all the shows we had lined up because it’s clear that the venues were not reopening any time soon. My bassist messages me a video, the Chad LB Virtual Big Band doing a remote video performance, and says “Not sure if you’ve seen this already but just throwing the idea out there for FJO…”. And that was the tipping point that led into an 8-month rabbit hole of DIY videography, music production, bedroom recordings, color grading, international collaboration, and lots of logistical organization.
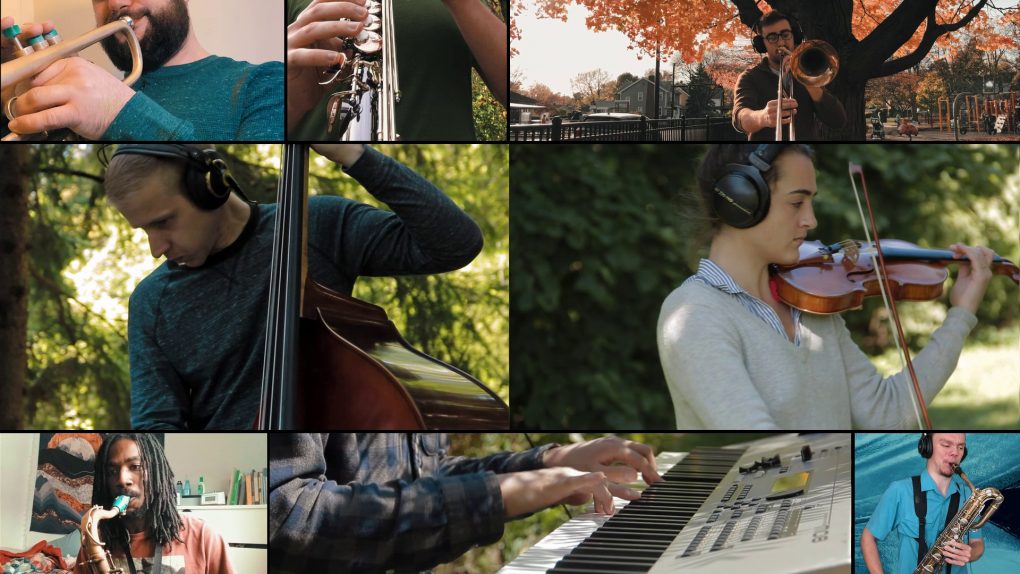
The Brooklyn Rose Future Jazz Orchestra is a 10+ piece supergroup of musicians from around Columbus. This is the story of how we made 4 music videos under quarantine.
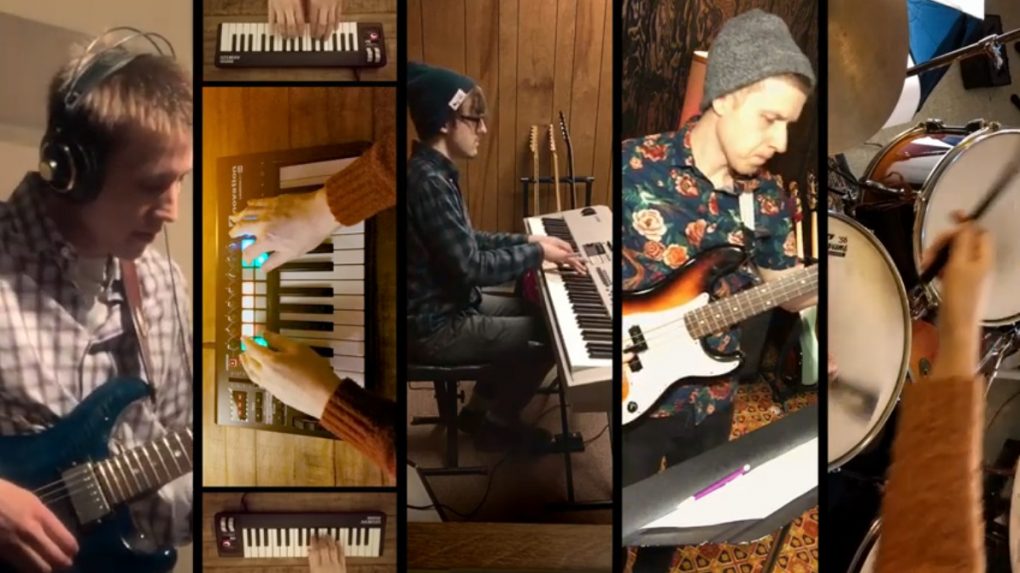
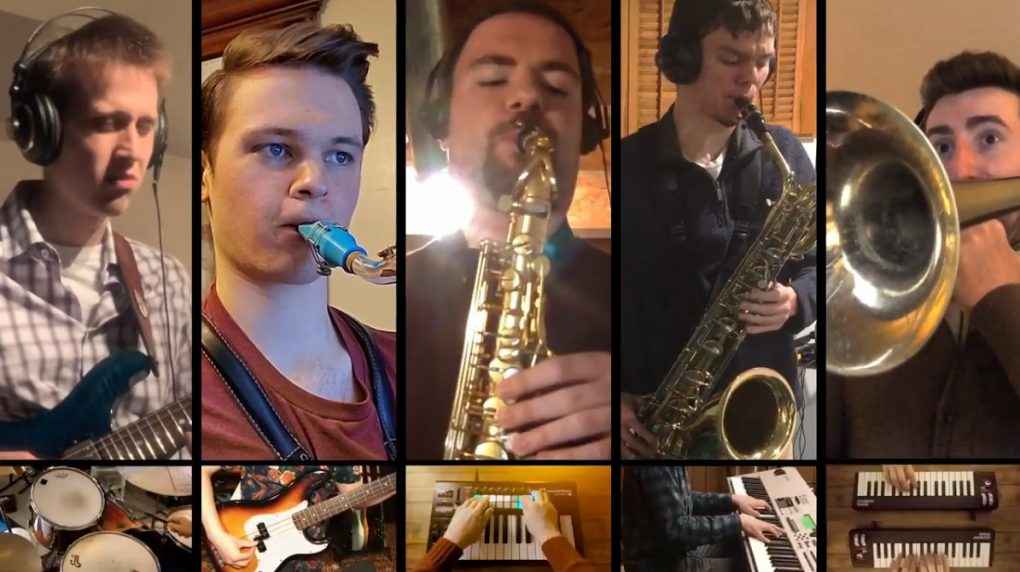
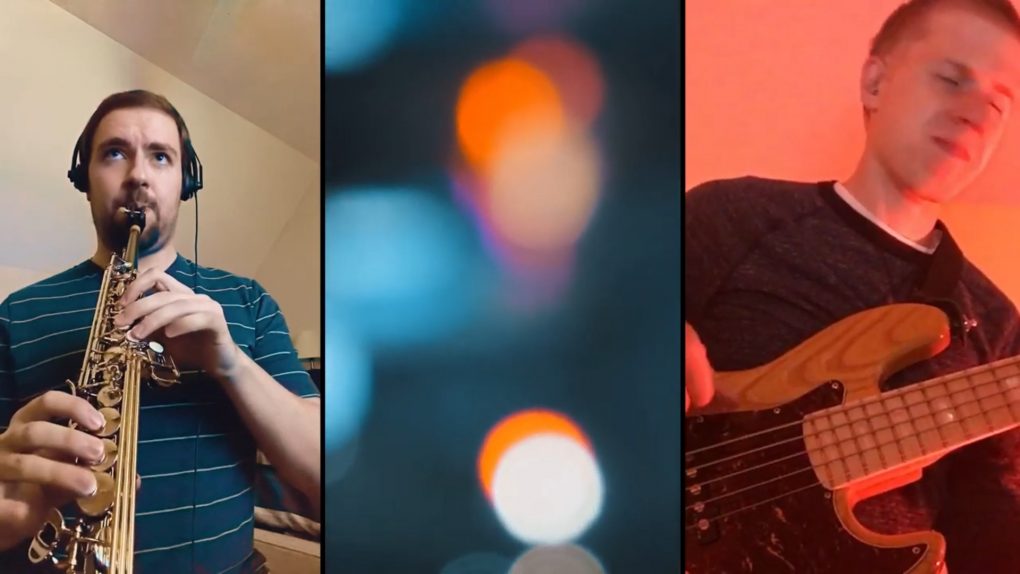
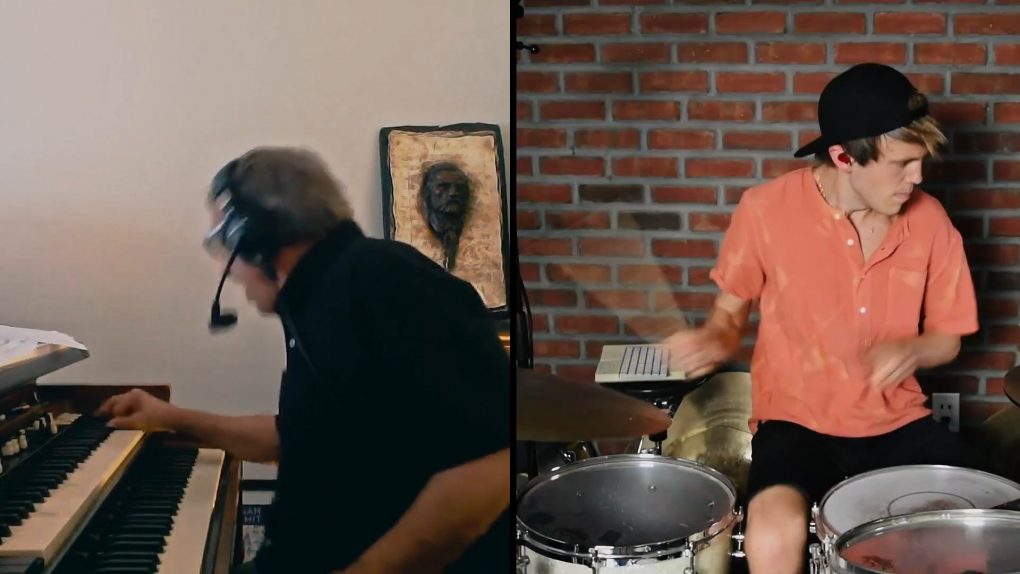
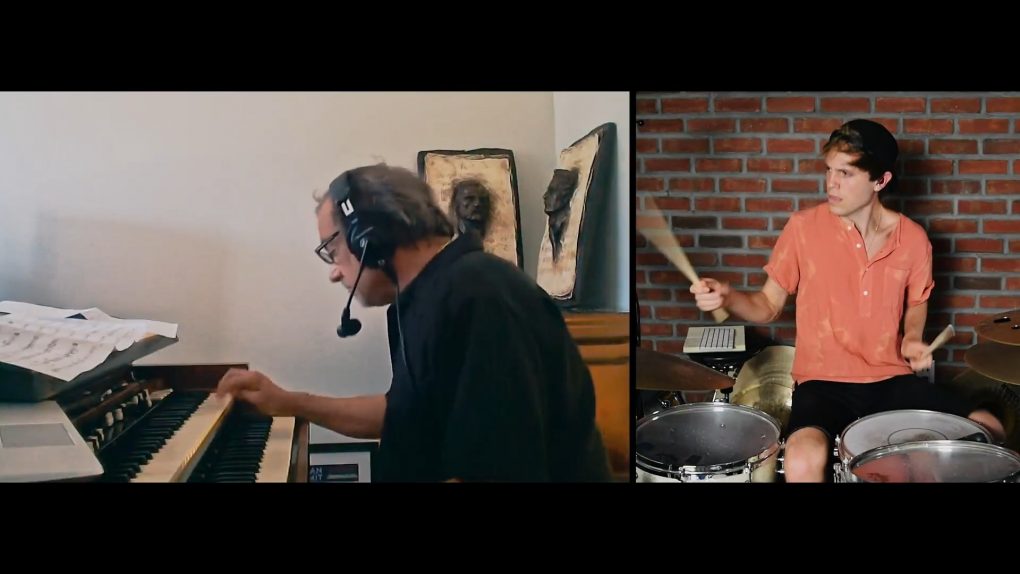
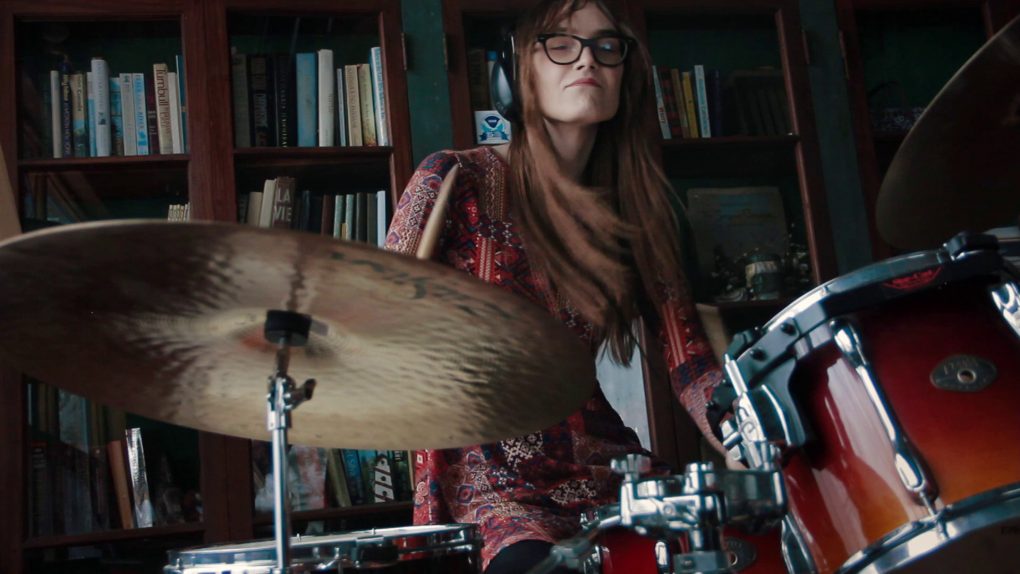
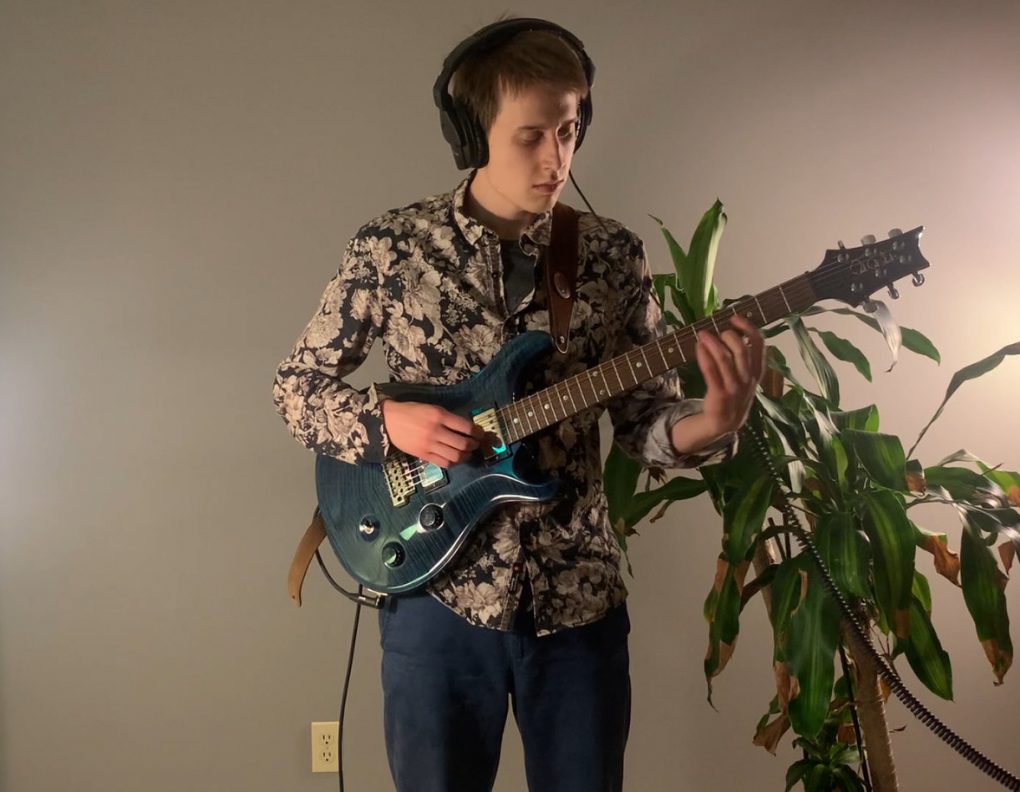
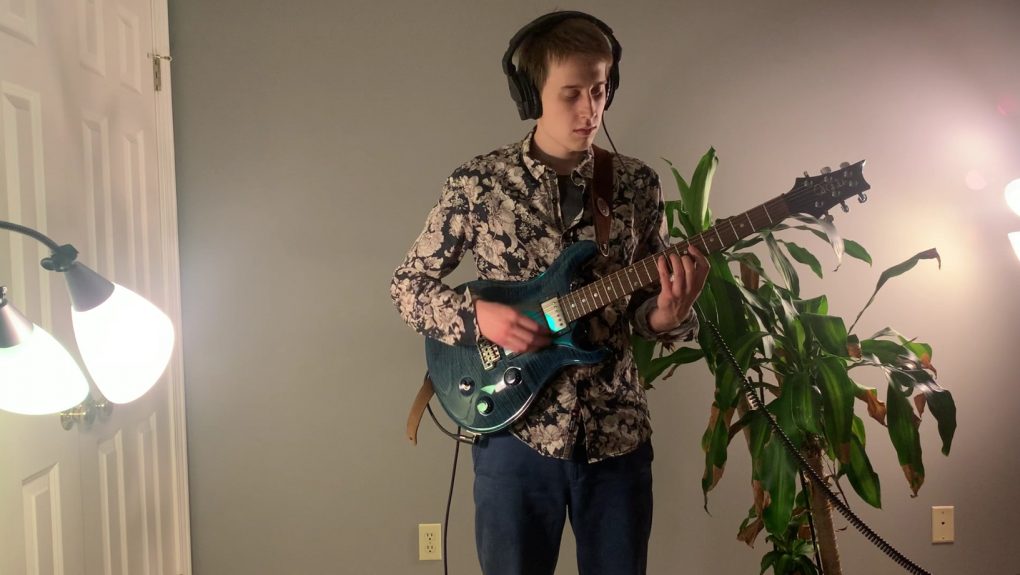
Attempt 1: 2:30am, i miss your lips on mine
The operative phrase of this production was “winging it”. At this point, I was still just learning how to use my editor. A lot of us were figuring out the audio/video recording as with went. And I had never managed a remote collaboration nearly this big before. Just keeping organized with all the different audio and video files was a task in itself.
But we pulled through, and the resulting video is not bad for a first attempt.
What worked
The color scheme

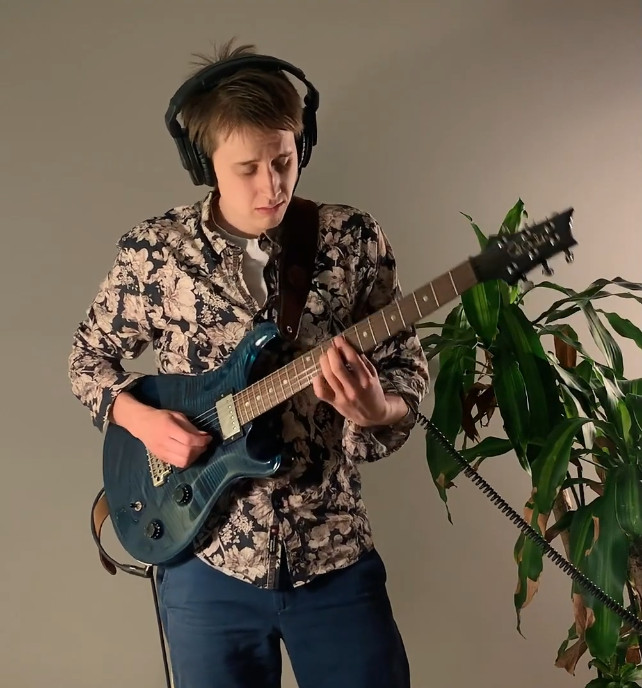
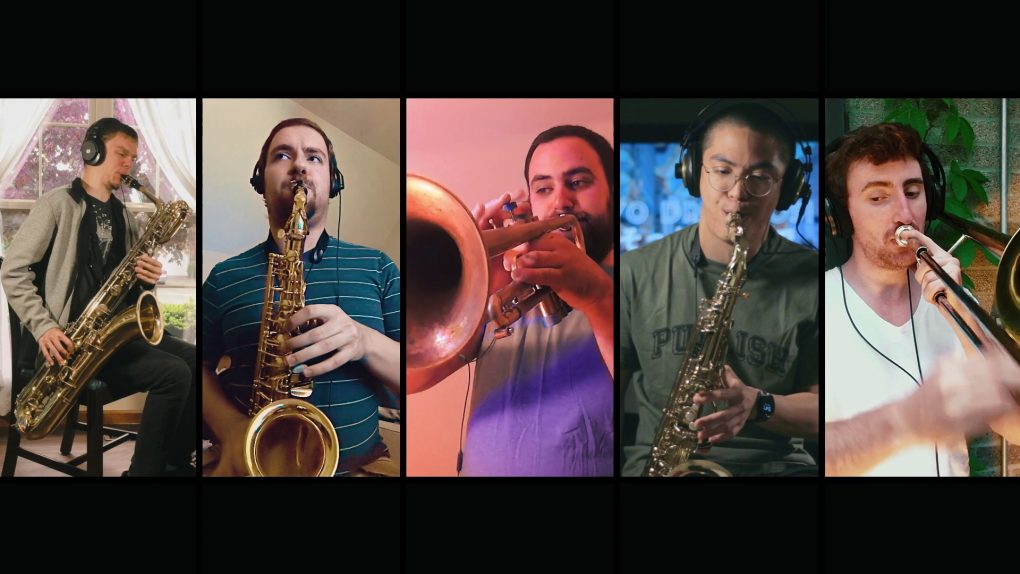
The aesthetic idea for this video was an analogous warm-tone color scheme, with optional deep blue in the lowlights. I sent a color palette to all of the performers and that informed what we wore, where we recorded, and in some cases what instruments we used (pretty blue guitar, etc). Then, I did some nudging in the grade to get a nice golden yellow glow across all the different videos. I think it gave the video a more cohesive look than if we hadn’t planned anything.
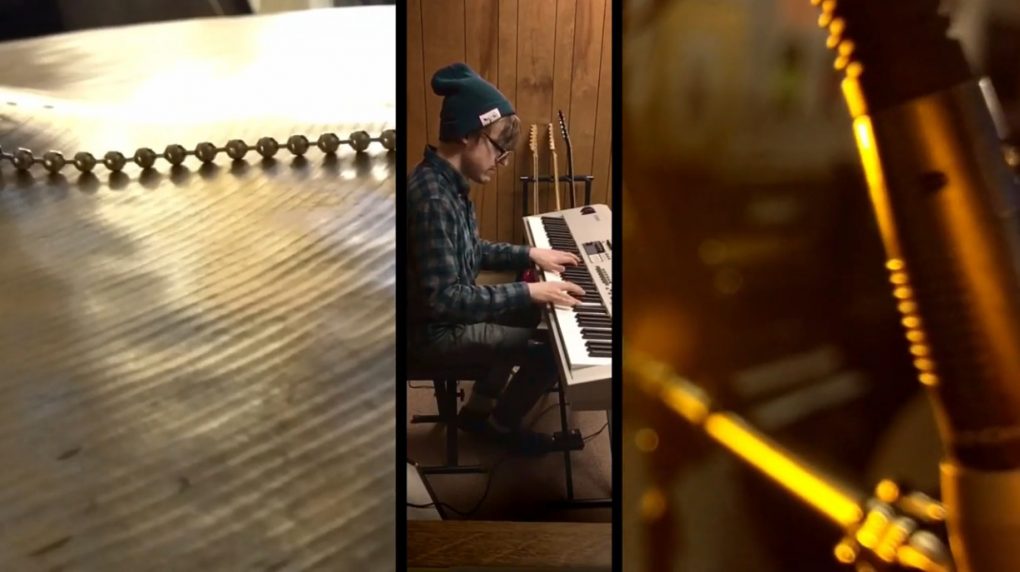
The B-roll
I’m not sure what inspired me to do this, but I’m glad I did. As I was finishing up filming the drums, I grabbed my trusty HTC 10 off its tripod, locked the autofocus as close as it would go, and just started pointing it around at things in my practice space. Cymbals, lights, headphones, Ableton, my interface, messy cables; looking for anything that would look cool from this blurred out, shallow focus, macro perspective.

And I’m very happy with how it turned out. I think the B-roll footage added a new layer of atmosphere and visual polish alongside the rigidly tripod-mounted shots of the performers. It also it set the stage for me to experiment with more extensive B-roll in future productions.
The Recording
I think the audio recording for this song came out very well, especially considering the unconventional recording tactics we used.
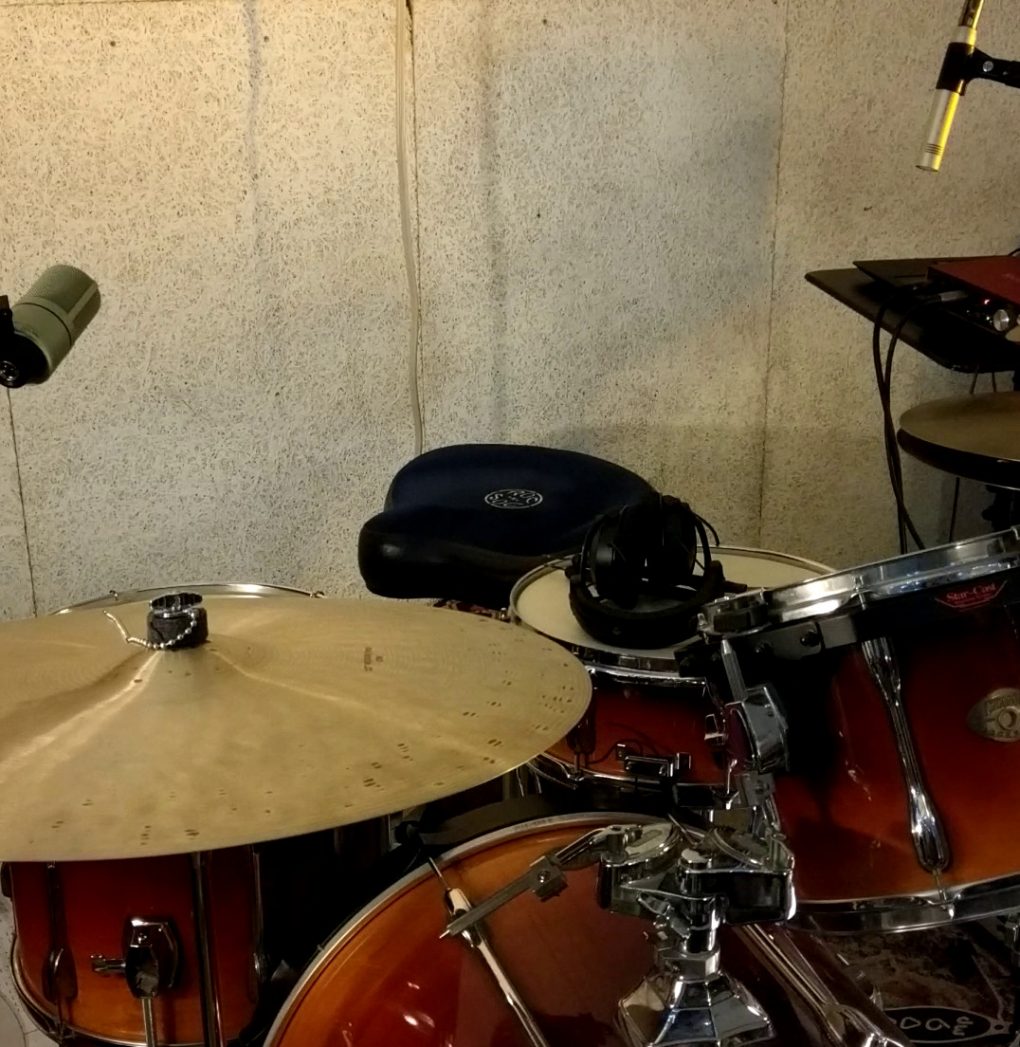
The drums were done with a pair of mismatched condenser mics. I put a small-diaphragm condenser over the hi-hat and a large-diaphragm condenser over the ride/floor tom. Both of them very low, close to the kit and facing the snare. It’s far from a conventional mic setup, but it accomplished exactly what I wanted: an extremely wide and detailed soundscape of brushes whisking over the snare and flicking on the cymbals. This blended perfectly with the electronic lo-fi hip-hop drums that were holding down the groove of the song.
The bass, guitar, and piano were all DI. Looking back, it would have been wonderful to get the piano in stereo. But that didn’t even occur to me until I was already in the mix, and the first take was just so beautifully performed that I didn’t want to redo it. That stereo information will go down in history as an ephemeral artifact, forever lost to the ether (until we train an AI to stereoize mono piano performances, machine learning engineers take note).
And there’s one more beautiful anecdote to this recording that needs to be shared. For reasons that I can’t remember, there was some trouble with the soprano sax audio. And so I ended up getting the audio by ripping the 128kbps stream from the video file—all noisy and clipped to hell by the phone’s auto-gain control—and using that as the melody line in the final mix. All of my prior engineering knowledge tells me that this sacrilege should have never been attempted, but it ended up working better than it has any right to. All the excess saturation made it blend nicely with the guitar and the lo-fi feel, so I’m counting this as a win.
What didn’t work
The Mix
This was my first mix of the series, and it was pretty rough. I learned a ton about mixing from April to December and the quality difference from my first mix to my last mix is apparent. At the end of it all, I revisited 2:30am to polish it for the EP release. But the original mix accompanying the video will always stand as a time capsule to my mixing skill in April, 2020.
The Grade (kind of…)
This is a stylistic preference, but most of the clips in this video are clearly pushed very warm. You can see it in the skin tones and on the white walls. Now looking back with 8 more months of grading experience, it looks kind of dingy to me.
If I were grading this today, I would go for a more neutral white balance, push the saturation a bit, smooth the skin tones, and then possibly add a LUT to create a pretty and clean warmth over everything.
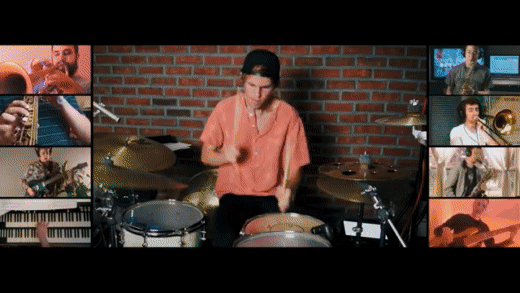
The Editing
I don’t like how I edited this video. Just boxing everyone up in those thick gridlines and then sometimes holding one shot layout on screen for 20 seconds or more. Its makes for a very static feeling video, like a glorified Zoom call.
I say this because someone said to me afterwards “yeah man, I liked that zoom call your band did.”
And I truly appreciate the sentiment, but after hours of video editing to the best of my ability, that cuts deep, man. It was at that moment that I knew I had to try something different for the next one.
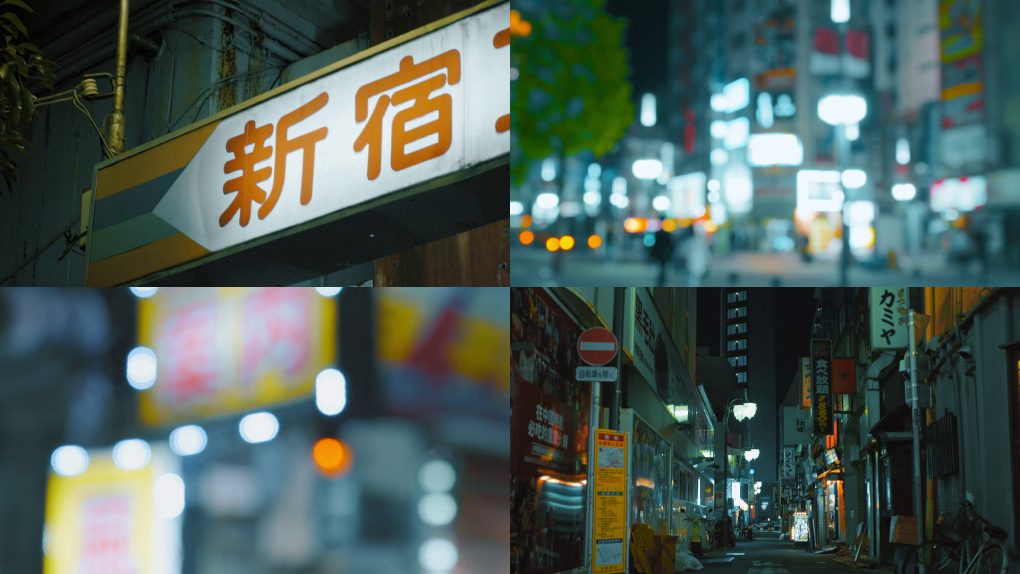
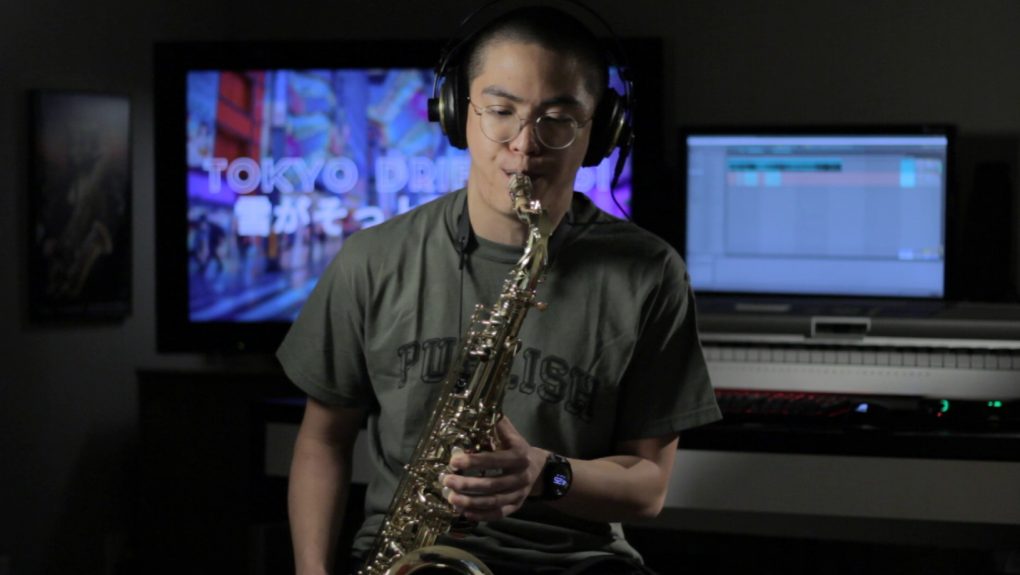
Attempt 2: TOKYO DRIFT 2051//雪がそっと降るので
Emboldened by our success with 2:30am, I decided to kick the difficulty up about 6 notches with TOKYO DRIFT. This production process was brutal and I had to constantly step up my skills in every area as I worked through it. Video compositing in Resolve’s Fusion, extreme color grading, working with a mix engineer who isn’t myself, learning how to communicate with our featured artists and videographer from the other side of the world. This was a journey that I never could have anticipated.
What worked
The Videography
Here’s a story:
One day, I was walking around on top of a parking garage pondering how to record B-roll for this next video. Columbus is such a clean-looking city, but this song is about an ambiguously-dystopian cyberpunk future. We needed grit.
And then it hit me: there’s probably a videographer in Tokyo right who’s in the exact same situation we are. No gigs, no hangs, no scene. We have 0 production budget, but I could pay a modest amount for their time and effort. Seems like a win-win, and it would be way cooler than me walking around parking garages with my phone.
So how do you actually find a videographer on the other side of the world? Well it’s easy, you just:
- Scour Google, pouring over numerous Japanese artist groups, message boards, and portfolio sites
- Wade through uncountably many artist profiles, most of which are long abandoned or have no useful contact info
- Send battalions of cold emails/messages into the void (subject: looking for videographer)
- Follow an obscure lead from a YouTube channel that’s been inactive for eons with only one piece of contact info to go on
- Meet a film director from Europe who, out of the kindness of their heart, passes your message on to some connections in Tokyo
- Quickly hear back from multiple indie videographers who are doing exactly the kind of projects that you’re interested in
I am eternally grateful to that kind director for making this part of the project possible. And after looking through all of the portfolios I received, I decided to work with Barbarian Blue.
Now, I have no experience with proper photography direction. So to help explain my concept, I gathered a whole bunch of concept art that matched the look I was going for.
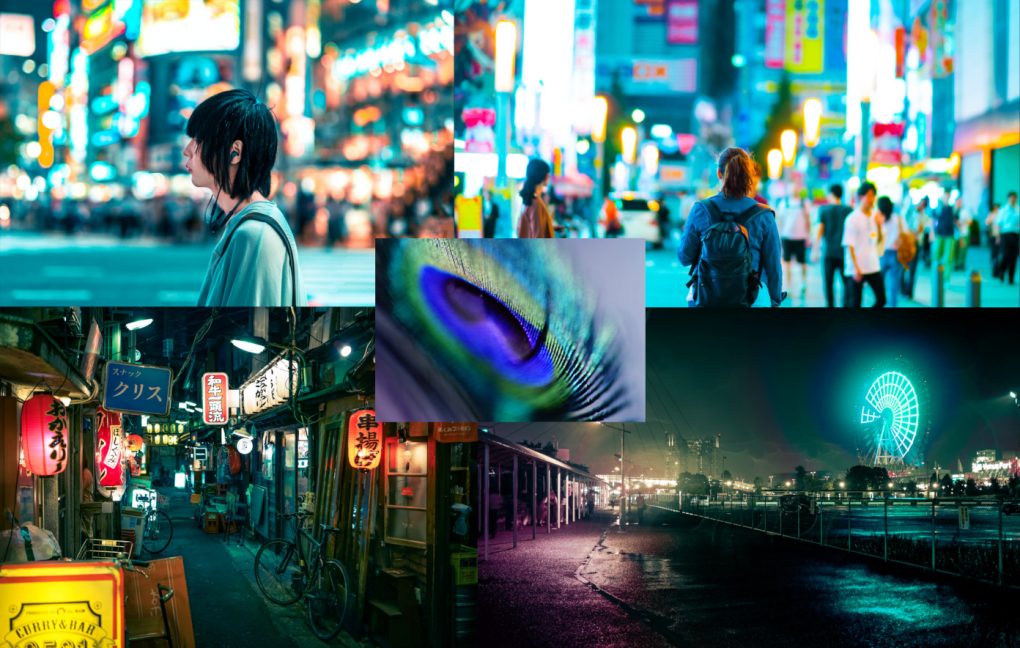
And it turned out beautifully. Barbarian Blue set out one night into the heart of Tokyo with a DSLR and came back with loads of neon, shallow focus footage shots from the Shinjuku/Kabukicho area.
It was probably a million-to-one shot that this idea would work, and it worked out better than I’d ever hoped. This was a video that could truly only be made in 2020.
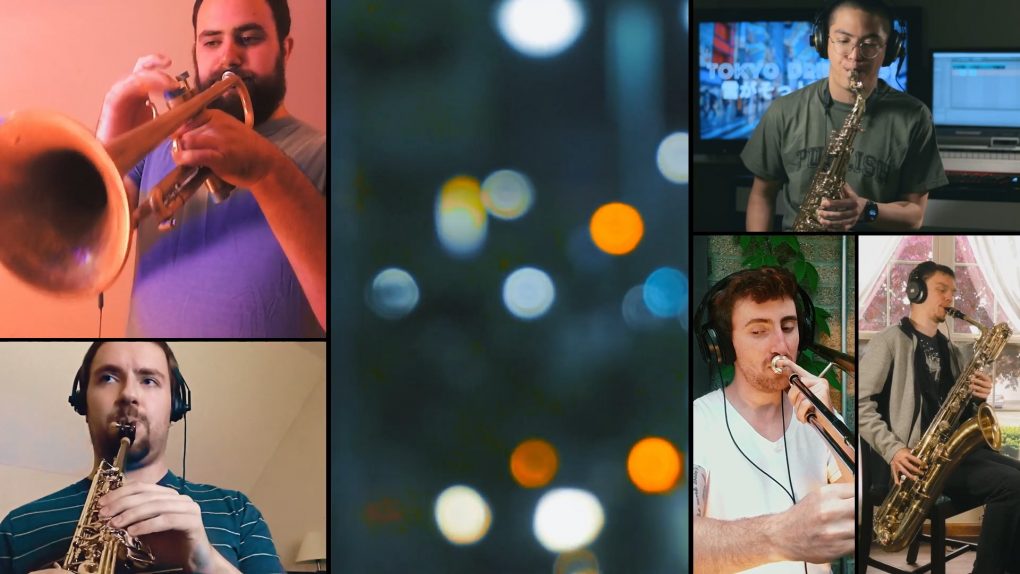
The Guest Artists
They nailed it.
The Shots
We actually planned them this time.
The color concept for this video was a triadic scheme of cyan, red, and yellow. This feels like cyberpunk to me.

We were more intentional with lighting and framing too. Most people were filming on their phones, so we did video calls where I could see through their phone camera and help frame the shots. Then where possible, we also used lamps that people had to make DIY lighting setups (more on this in the tutorial section).
The Gridding
I put more thought into the gridding on this one, laying out the gridlines by eye against a flat background until they looked proportional and organic to me.

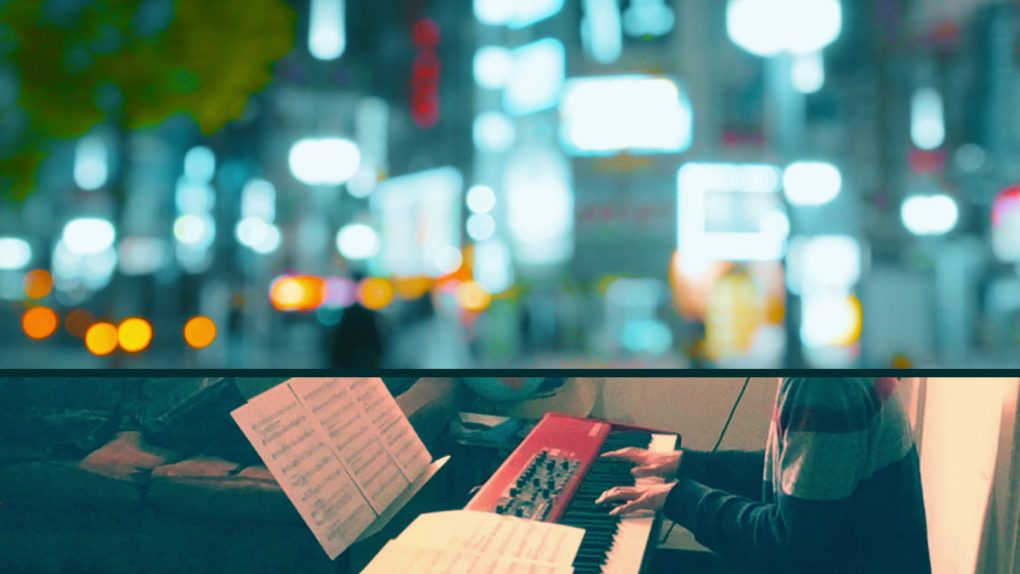
I also changed my gridding approaches for different sections to reflect contrasts in the music. For example, a lot of the song uses vertical gridding, as in the image above. But for the synth section (4:01), the instrumentation changes to be much more lush and atmospheric. I represented this in the grid by using ultrawide grids, evocative of vast cinematic aspect ratios.
The Grading
I really had to step up my grading game for this one, bringing out the colors in the musician shots and making the on-location Tokyo footage look extra intense.

I’ll go into specifics in the tutorial section, but here are a couple interesting details.
Whenever I had 3 clips on screen, I tried to arrange the B-roll and grading to fit the red-yellow-teal triadic scheme from our palette:
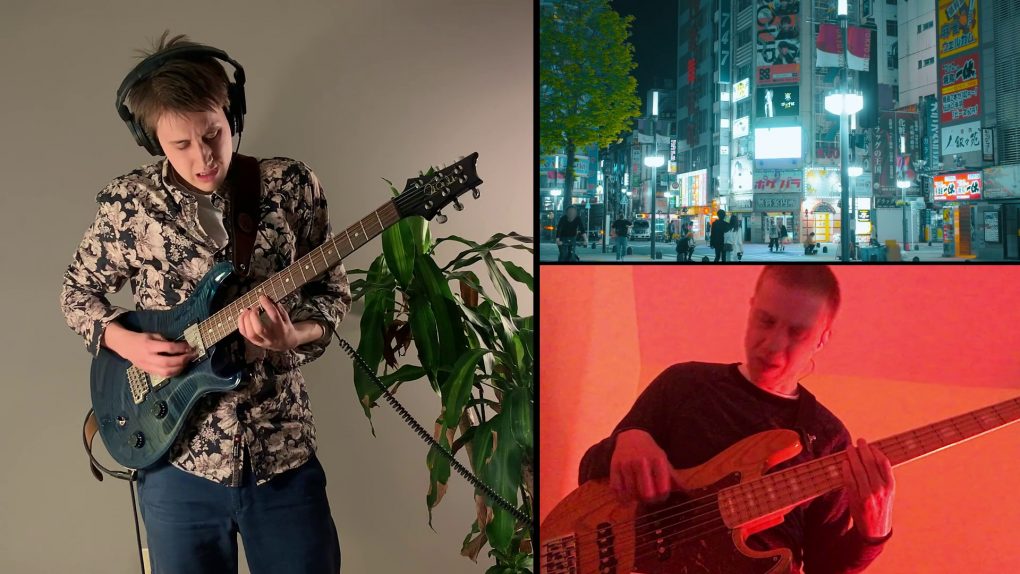
We ended up getting a really great spectrum of color in the horn shots, which allowed me to do this striking arrangement during the soli:
And during the synth section of the song, I used different grades to reflect the new timbres that are introduced. I put a slight red/teal split-tone effect on the keyboard/guitar shots for a washed-out look and rotated the hue of the bass shot from red to blue.
For those of you who are interested, I made a free Cyberpunk LUTs pack with some my favorite grades from this video.
The Aspect Ratios
This started as a practical thing. I changed the aspect ratio in the organ solo section because I wanted to have two clips side-by-side on screen, but making them fill the whole screen would have made each clip awkwardly tall and hard to crop aesthetically.
So I added a letterbox, allowing me to have each clip framed more widely.
But then I took this idea even further, using different aspect ratios to represent the energy of the music. Softer sections use the wider aspect ratio with a letterbox and louder sections fill up the entire frame.
This resulted in one of my favorite moments of the video (3:51) during the drum solo. It starts in the letterboxed wide aspect ratio. Then on the last hit of the drum solo, I cut out the clips on the sides of the frame. At this point, there’s only the drum clip in the center as a miniature frame-within-a-frame, letterboxed on all sides. It cuts to grainy B-roll momentarily, and then suddenly jumps to an encompassing, full-frame image at the start of the next section. I think the visual change really captures the shift in the music, from a closed-off, decrescendoing power chord to a lush, expansive electronic soundscape.
What didn’t work
The Framerate
If we were doing this over, I’d probably ask our guest videographer to film at 50fps instead of 30fps. Reason being that TOKYO DRIFT was on a 30fps timeline, meaning that the 30fps B-roll should play back in real-time. But it looked really nice to play the B-roll in slow motion for a dreamier effect. Luckily I could timestretch and reinterpolate the footage to fake slow-motion without creating too many artifacts.
The Editing (kind of…)
I think the editing on this is actually pretty good, I definitely succeeded in my goal of “making it not just look like a Zoom call”.
But looking back, I wish I would have included a couple full-screen clips of the B-roll. There are just so many beautiful scenes and in the video you mostly only see scaled-down or cropped versions, in part because of how much vertical gridding I used. But we’ll address this more in the next video.
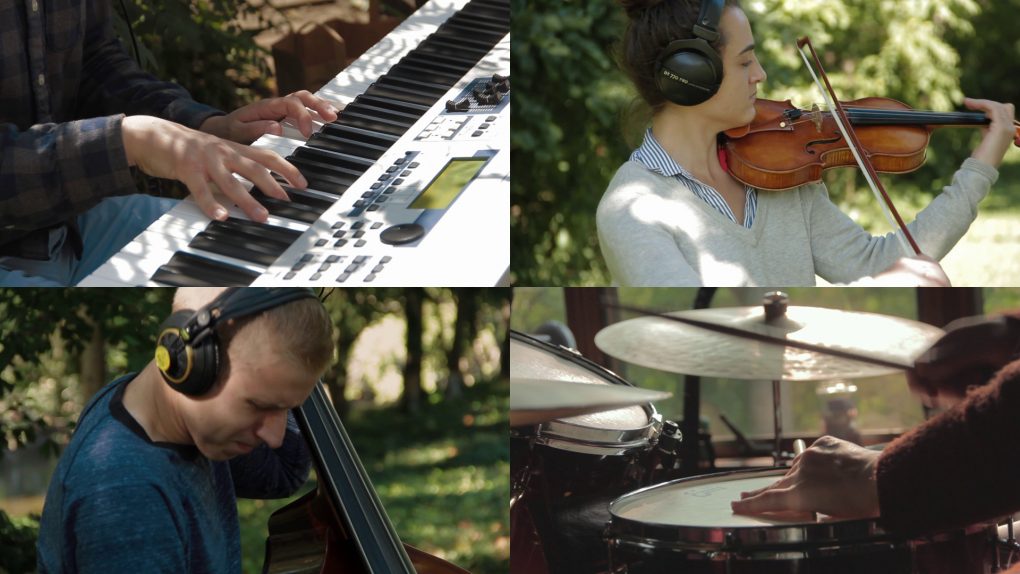
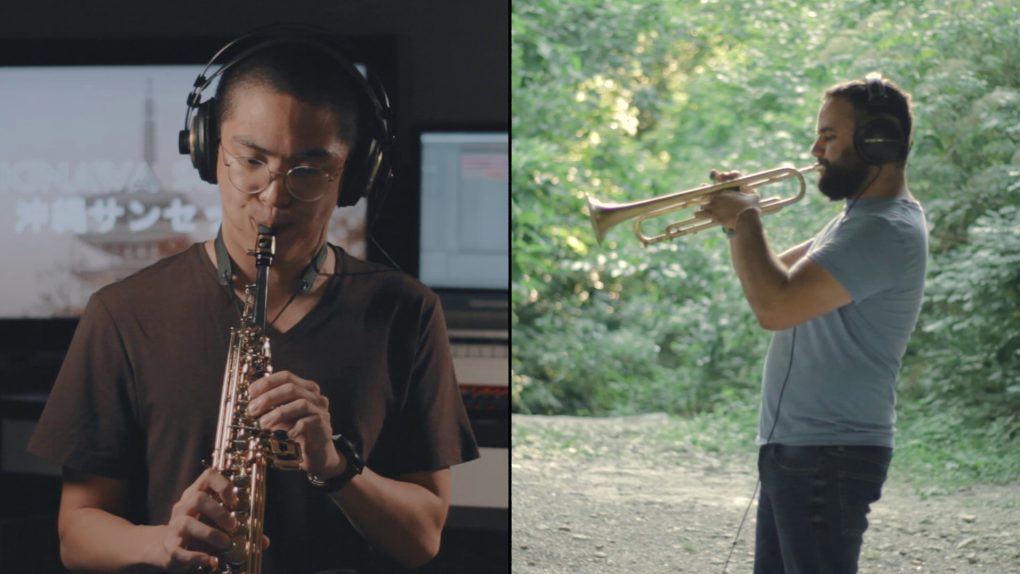
Attempt 3: Okinawa Sunset
Now seasoned videomakers with two music videos under our belt, I decided to once again change our approach. TOKYO DRIFT was cool, but it was still very rooted in the tradition of split-screen performance videos. What if we tried a more cinematic/live approach?
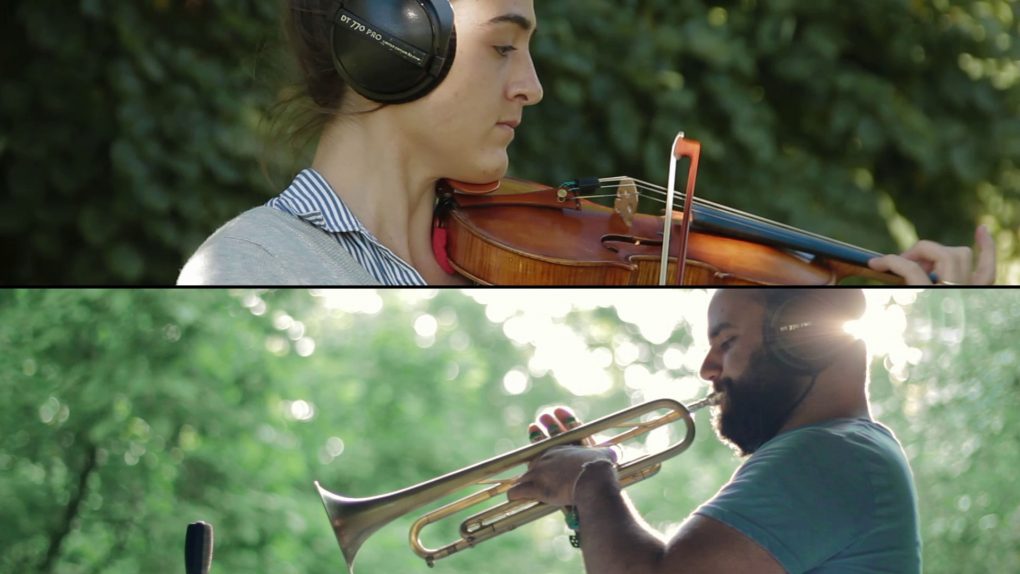
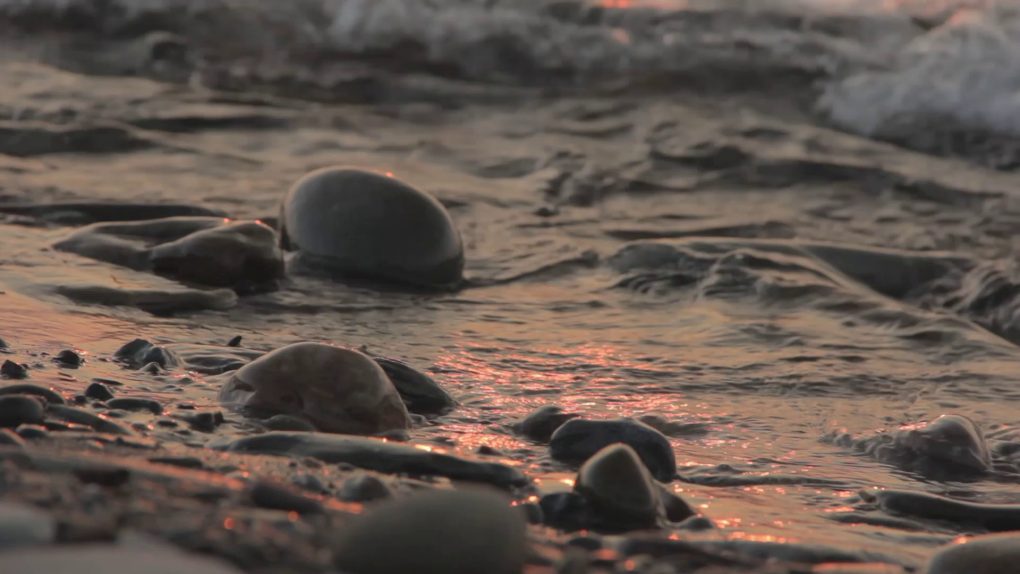
Nearly all of Okinawa Sunset was filmed during a wild 2-day road trip and recorded in public parks with audio/video gear that I carried in my backpack: three cheap microphones, my interface/laptop, and a DSLR I’d recently inherited and was learning to use on the fly. It was rough, it was scrappy, and it was the essence of life in August, 2020.
Now, this is more of a “socially distanced” music video than a true “quarantine” music video. I was filming and recording the performers instead of having them record themselves, but we were still able to do it in a strictly pandemic-safe way.
What worked
The Videography
I did make some rookie mistakes during filming, but all-in-all I think the final videography turned out really well.
Shout out to Jesse for filming the first session with the trumpet player before I had my own DSLR.
In keeping with my cinematic aspirations, we did this video at 24fps instead of 30fps like the previous two.
The Editing
I took a very different approach to the edit this time around. Where TOKYO DRIFT used a lot of gridding and split-screening, Okinawa Sunset is mainly full-frame shots. This is in part due to the increased video quality of the DSLR, another part due to the sparser instrumentation of this song, and in third part due to the fact that most of the musician shots were handheld and it just looks a bit weird to me split-screening two handheld shots (though I still did it a couple of times).
In places where I did split-screen, I mostly used horizontal splits to get extra wide clips. This is in direct contrast to the primarily vertical gridding I did in TOKYO DRIFT.
I also opted not to use a lot of B-roll in this video (even though I spent a whole day on the Erie Peninsula filming for it) because all the musician shots looked so nice already and there weren’t a lot of extra grid spaces to fill. And throwing random B-roll clips into the middle of the song distracted from the flow, so I decided to use just a couple at the beginning and end.
The Audio Production
I did a lot more with the audio production in this song, mainly because I’d spent the previous two months honing my skills at producing EDM and wanted to put it to good use.
So, there are a lot of waves on this track. Oceanside ambience that I got from free sample packs, camera audio that I ripped from the B-roll footage, samples of waves crashing that I cut and filtered to emulate EDM white noise risers. Here’s the intro of the song with just the wave tracks playing:
The waves are laid out to follow the contours of the music, washing over the section changes and adding a subtle feeling of outdoor space to the whole song.
In addition to the waves, there are also cymbal rolls/crashes, white noise sweeps, chimes, and impacts. A lot of these were samples from free EDM sample packs (thanks, Cymatics ❤️). To make them fit with the more organic nature of this song, I cut out the bright high end and added some reverb. This pushed them back in the mix and made them work a bit more subtly than they would in EDM.

These are two clips of the FX tracks during the soprano solo:
One trick that I really liked was with the cymbal production. I recorded the drums with only 2 (mismatched) condenser overheads. And they came out sounding pretty alright, but I wanted to get a little more space and lushness to fit the feeling of this song. So I added some extra cymbal rolls and crash samples with huge reverbs on them (12.5s decay) and then automated the panning during the decay to get a feeling of a truly huge space. I also automated huge reverbs on some of the individual snare hits, one of which can be heard at the end of this example:
Here’s another bit of studio trickery: this song was written for jazz band and a string quartet (violin/viola/viola/cello), but we only actually recorded the violin live. To fill in the rest I used my good pal, Native Instruments Session Strings:
And one last small production detail: during the second half of the B section (1:11), I layered in a celesta and harp panned hard left and right doubling the piano notes. Just to add a little more space and orchestral flair.
I also made a free sample pack with some of the waves FX and cymbal samples that came out of this production, for anyone who’d like to add some lush summer atmosphere to their tracks.
What didn’t work
There actually isn’t very much I would change about this looking back. It would have been nice to get video of our soloists in the same outdoor style as the rest of the musicians, but that just came down to logistics. It’s an inherent compromise of making these videos under quarantine and with people living in different places.
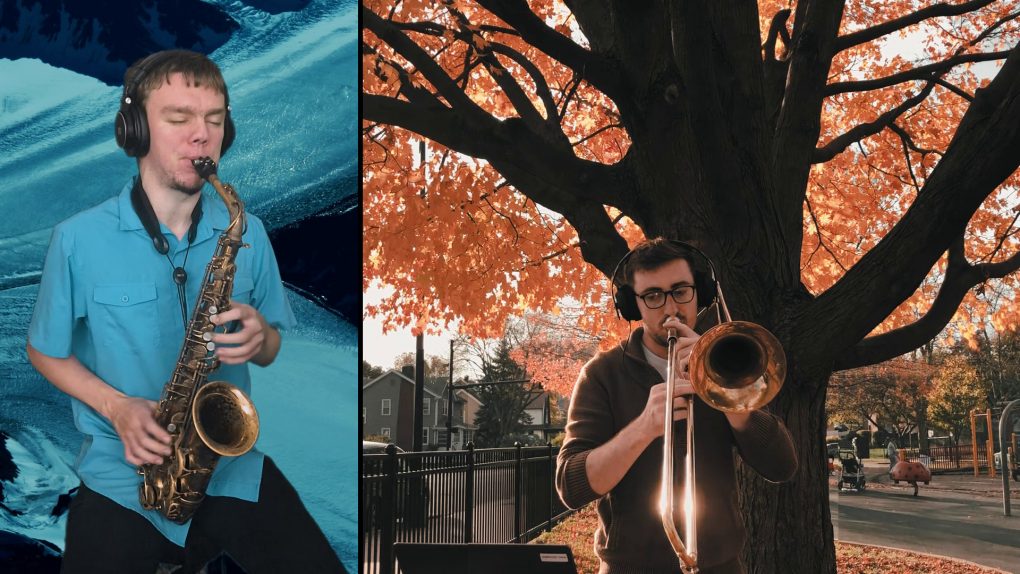
Attempt 4: Dark Beast Ganon
The final video, the apex of our quarantine journey. This one was really about combining and polishing all of the techniques I’d learned so far.
What worked
Putting it all together
We filmed some of this during the Okinawa sessions, so we had really nice, cinematic footage of the bass, piano, and violin. Then the horn players recorded themselves TOKYO DRIFT quarantine style. And in the edit, I combined techniques from both. Some gridding and split-screening, some nice full-frame shots, grading to bring out the colors of each clip and make a pretty composite image.
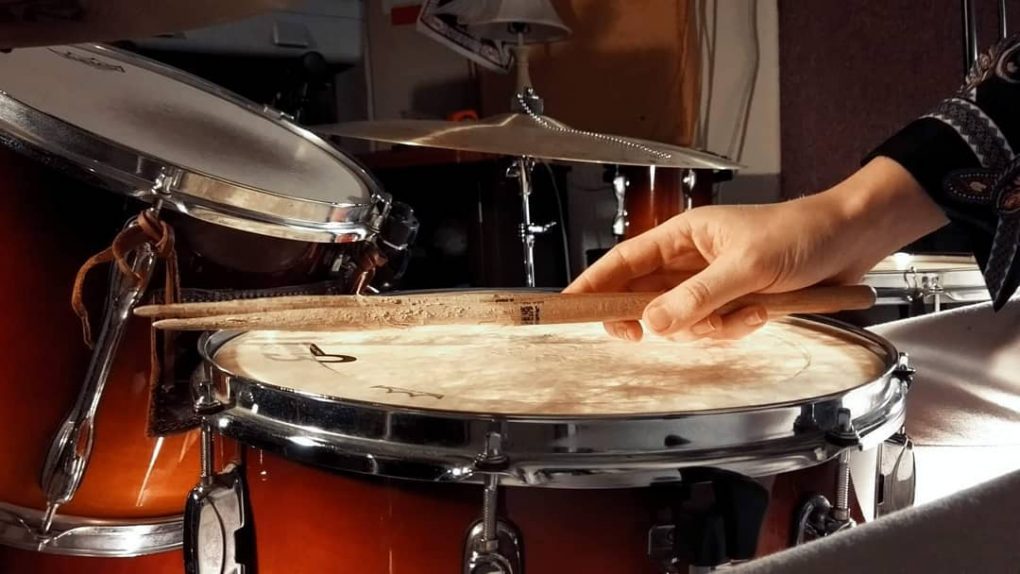
The Drum Shots
I did finally figure out how to get decent looking drum shots in the space where I’m recording.
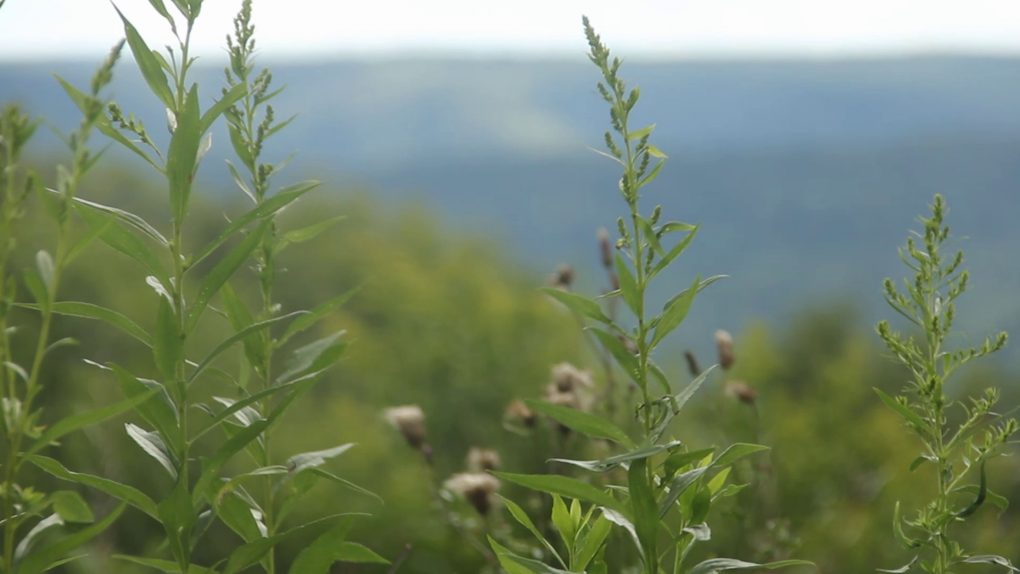
The Ending B-roll
The B-roll clip at the end of the video (5:21) is from an adventure I had in the Pennsylvania mountains. The flowers reminded me of the Hylian herbs that are everywhere in Breath of the Wild.
What didn’t work
I would have liked to get better shots for some of the videos, but at this point I’m just awaiting the day that we can film together in one space again.
So, what did we learn from all this?
A global pandemic is no match for human ingenuity and artistic inspiration. 2020 was a year of trials, but also a year of people creating great art in new ways all around the world.
If you’ve been thinking about an artistic project, the best time to start it is as soon as possible. It doesn’t have to be good; if you’re just starting out it probably won’t be. But focus on the process of creating and learning, and you will get better. There was a vast difference in quality from my first video to my most recent, and I’m sure my future projects will dwarf the ones that I feel proud of right now.
Don’t let gear hold you back. We did the first video mainly with cellphones propped up on music stands. I mixed it all on my laptop with headphones. We broke every rule. Even at the height of sophistication, the best we had was three cheap mics and a 10-year-old DSLR, recording in public parks. So get the gear that you absolutely, essentially need, but focus the rest of your time and energy investing in yourself and your skills. This has been a wild ride and I’ve learned so much.
So my point is: if you want to create, just create. And here’s to a strong and skilled 2021 ☀️
Tutorial: How to make a quarantine music video
For those of you who want to stick around and get into the gritty details, here’s my consolidated tutorial on how to really make a quarantine music video in 2021.
Disclaimer: I’m just an amateur videographer and it’s possible that I have no idea what I’m doing.
1) Pre-production
Plan your concept, color scheme, references, etc
Putting thought into your concept up front will help you get a better looking final video. The bare minimum would be to just pick a color palette and ask people to record in spaces that fit the palette, but there’s really no limit to the interesting concepts you can come up with. Watch some music videos and look for inspiration (I love Submotion Orchestra and Fox Capture Plan).
Some various ideas I’ve had are:
- Super sparse frames (everyone against flat white walls with a lot of space in the grid)
- Colored frames like the horns in TOKYO DRIFT
- Artificially colorized frames, like a stained glass window
Unsplash is a great place to browse for concept art. Pixabay, Pexels, and Videvo are great sources for free stock video.
Choose a timeline frame rate
This is the frame rate of your project timeline. This frame rate affects how you’re going to film and edit, as well as the final look of the video.
30fps is the standard; most videos you see online are probably 30fps. 2:30am and TOKYO DRIFT were both done at 30fps.
24fps is commonly used in films, so it has the association of looking “more cinematic”. There are fewer frames and more motion blur (as long as you shoot it right, 180-degree shutter rule). It is a bit harder to stabilize handheld 24fps footage than 30fps footage due to the motion blur. And you also don’t have a lot of leeway for time stretching 24fps clips before they start to look choppy (more on this in a moment). One trick I like to do is record B-roll footage at 30fps and then play it back on a 24fps timeline at 80% speed so all the frames line up. This creates a nice dreamy slow-motion look.
60fps is something you can use if you want your videos to look like junk. Fight me.
In fairness, 60fps is actually a nice timeline to use if you have mixed frame rate footage. Live drums and other shots with a lot of precise motion tend to look good at 60fps. For the first Future Jazz Orchestra concert video, we had a knockoff GoPro on the drums at 60fps, a phone capturing the wide shot at 30fps, and a DSLR with the close shot at 24fps. Then I edited it all on a 60fps timeline and it all played nicely together.
25fps/50fps are more common in Europe, and they’re not substantially different from 24fps/60fps. Though I do prefer 50fps to 60fps any day.
So now you’ve chosen your timeline frame rate. Here’s how it affects the filming process (write this down because it’s going to be on the test):
The frame rate you film at should match the timeline frame rate for any clips that are to be played back in real-time (100% speed). For music videos, you’ll generally want the shots of the musicians to be real-time so they line up with the music (unless you’re doing an arty effect). This means 30fps footage for a 30fps timeline, 24fps footage for a 24fps timeline, etc.
But for other clips, you can get more artistic with it. If you want to play a clip back in slow motion (which I highly recommend for B-roll), you should film at a higher frame rate than the timeline frame rate. As I said before, I quite like the look of 30fps B-roll on a 24fps timeline at 80% speed.
It is also possible to time-stretch clips that are at the wrong framerate. But this is not optimal. Sometimes it will cause artifacts and other times it will look fine. I actually recorded one of the violin shots in Okinawa Sunset at the wrong frame rate (30fps on a 24fps timeline). I used Resolve’s optical flow algorithm to smoothly interpolate the frames, but it still had some artifacts due to the motion in the shot. So I just avoided cutting to that take where possible.
Similarly, you can time-stretch clips to fake a slow-motion/fast-motion effect. I did a lot of this on TOKYO DRIFT (30fps B-roll on a 30fps timeline). In general, I could slow the shots down to around 75% speed before the choppy artifacts got really noticeable. And as I said earlier, doing this same thing with 24fps footage on a 24fps timeline would be much less forgiving because there are fewer frames to trick your eyes into seeing smooth motion.
In 2:30am, I recorded my B-roll footage at 30fps (on a 30fps timeline) and then slowed it down to around 60% to intentionally make it kind of choppy. I wanted to evoke the feeling of an old home video.
2) Production
Directing the performance shots
The key to this is to get on a video call, ideally so you can see through the camera they’re going to film with, and work with your musicians to plan a good shot. What makes a shot good?
- Good location. Somewhere that looks nice and fits the concept of your video.
- Separation between the subject and background. Having someone record against a background that contrasts their instrument, clothing, and skin tone is good. Lighting can also help achieve separation from the background (more on this in a minute).
- Good placement in the frame. For a split-screen music video, you’ll generally want the subject centered with some space on all sides so you have leeway for cropping during the edit.
- Aesthetic use of lines and geometry. I don’t have a lot to say on this, I just know it when I see it.
- An uncluttered frame. Having a lot of visual noise in the frame is distracting.
- Really close up aesthetic angles can be cool sometimes, especially on a phone because it’s just about the only way you can get a shallow depth of field. Macro shots on a cellphone tend to look better than other cellphone shots to me.
- Good lighting. This one is so important that it gets its own section.
- Lastly, you’ll want to confirm that they’re filming at the timeline framerate you decided earlier.
Here’s a case study on one bad shot and two good shots:
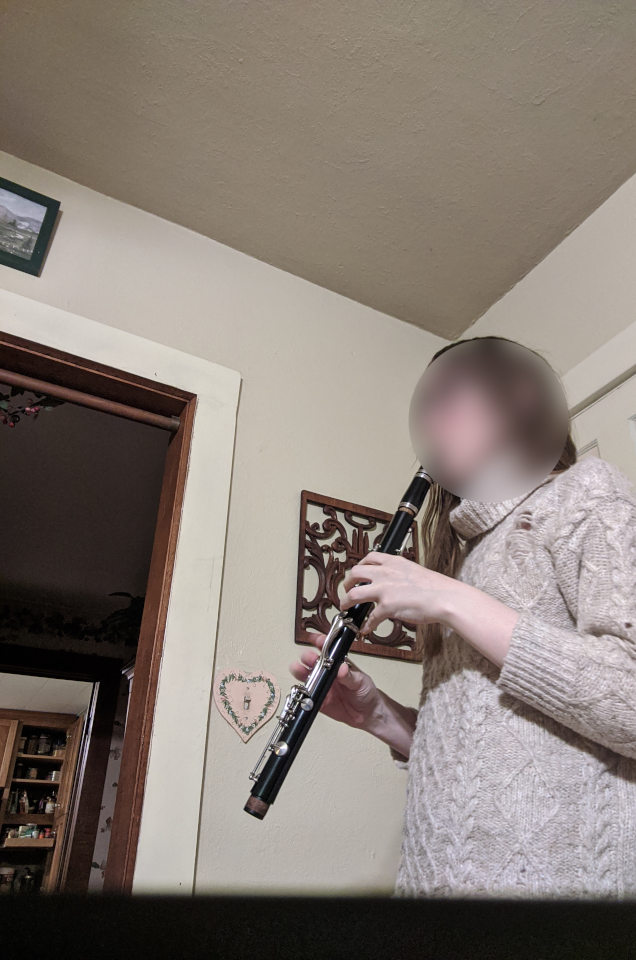
The lines of the doorframes and ceiling are adding a lot of visual clutter to the frame. The wood carving on the wall also obscures the line of the clarinet. It would be much better to shoot against a flat wall. This is going to be really hard to crop because the subject is on the edge of the frame. The camera is also at an awkwardly low angle, it would be great to raise it a foot or two and then tilt it down. The lighting is poor; it’s just lit by a single ceiling light which results in a really flat look on the subject with some awkward shadows. The clarinet isn’t even fully assembled. There also isn’t great background separation with the beige sweater against the white walls. It would be better with a dark-colored shirt. Or even better, find a way to light the subject without casting so much light onto the walls.
This is a pretty solid shot. There’s plenty of room to crop on all sides of the frame. The frame is pretty clean and uncluttered. The green and blue colors are nice and you’ll be able to really pull them out in the grade. And the lighting is excellent. It’s really helping the subject stand out from the background.
This one is fantastic. Again, plenty of room to crop on the sides of the frame. Clear separation of the subject and background achieved through lighting and depth of field. It does look a little dark, but it will grade nicely.
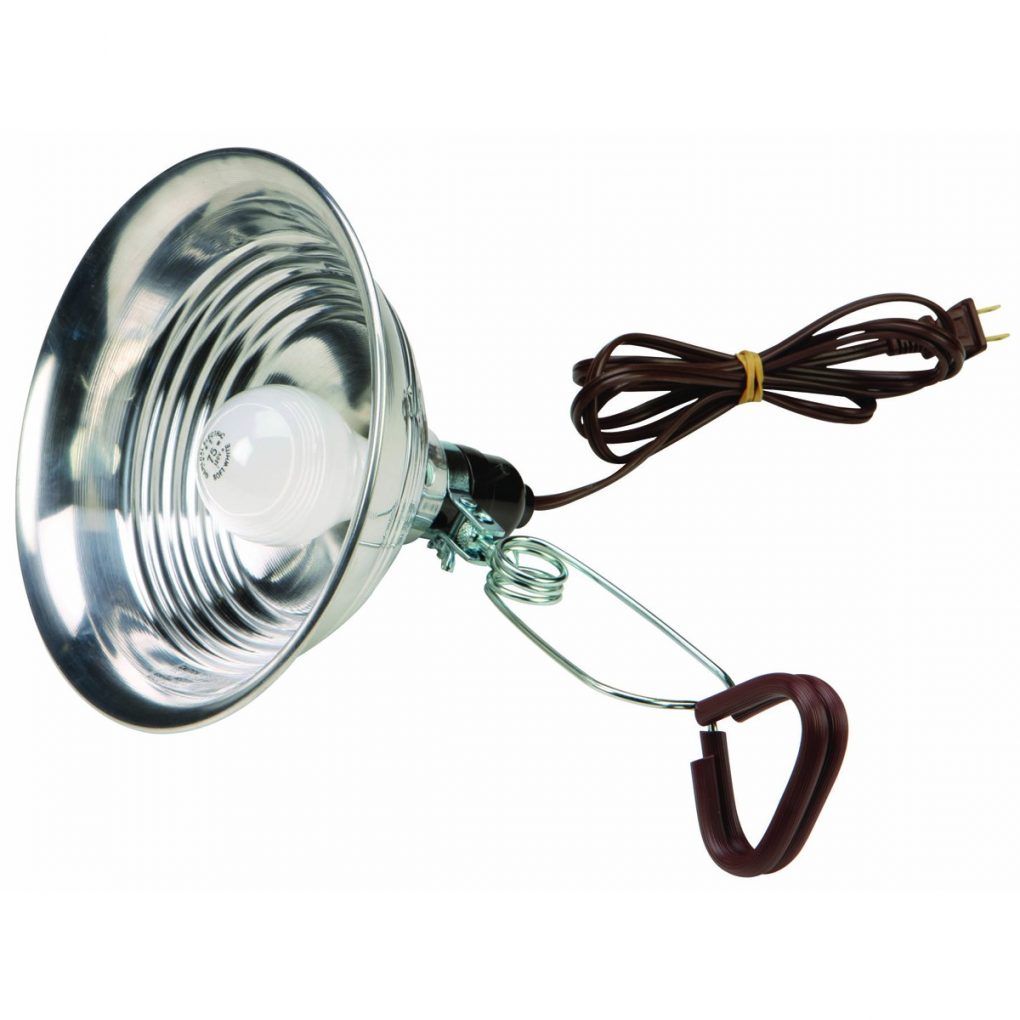
DIY Lighting
Having well-placed lighting is the key to getting great shots, even with a cheap camera. And there’s a lot you can do with regular house lamps and a cell phone.
First of all, read up on color temperature if you’re not familiar. You’ll want all of the lighting you use to have the same general temperature of bulb. Mixing color temperatures tends to look weird and makes it harder to grade.
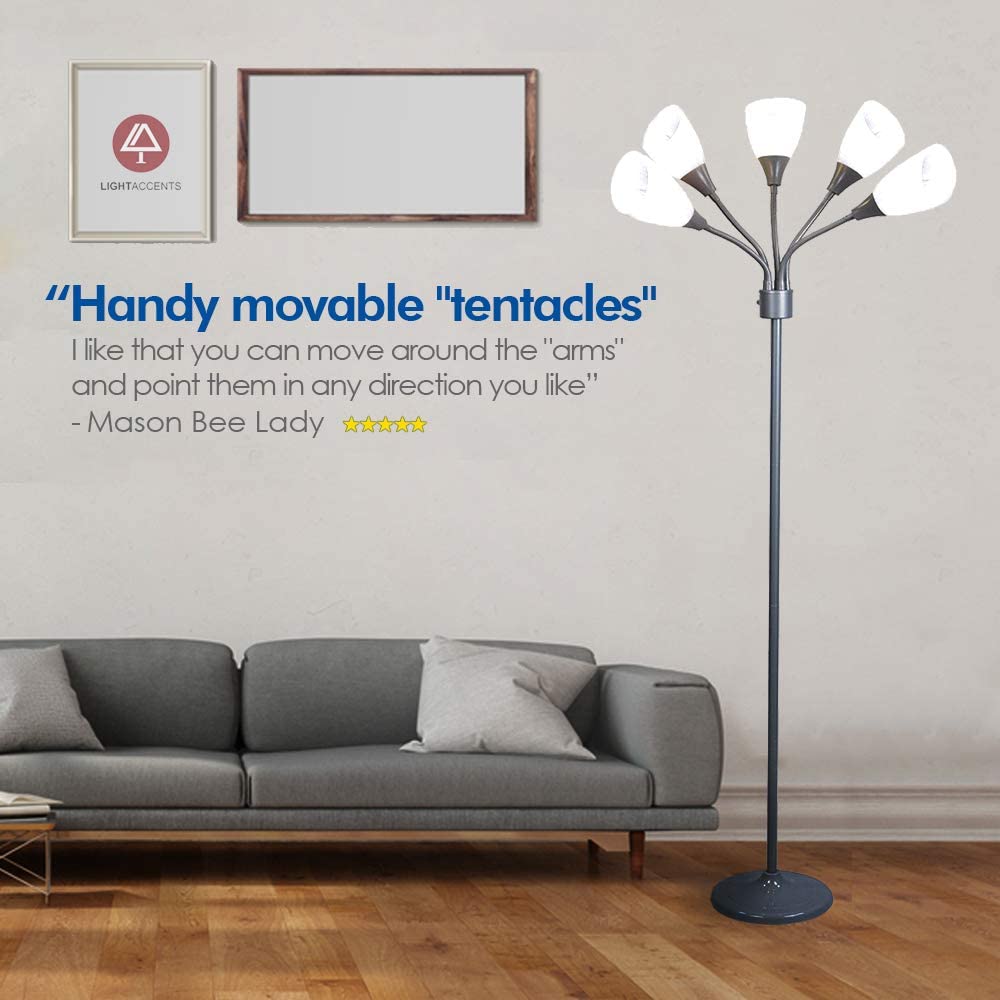
My favorite type of lighting for music videos is the double back/double side setup. You have two back or side lights on the subject and it makes them look really detailed and dramatic.
This is a shot we lit with two multi-headed standing lamps. Those lamps are really great for DIY lighting because they’re bright and the light comes from multiple sources instead of a single bulb. This allows them to emulate the feel of a softbox (read up on hard vs soft light if you’re not familiar). Because the light is hitting the subject from the sides, it creates a lot of small shadows that emphasize all the details. If the light was directly in front of the subject, it would look a lot more flat and also not separate them from the background as well.
Aluminum clamp lights also work well. They provide a hard light, which isn’t ideal, but they’re also cheap and very flexible for positioning. I like to use them as back/side lights where the hardness doesn’t matter as much. I’ve also used them as fill lights before and they do alright. Some people recommend putting parchment paper over the front to soften the light, but I haven’t had good luck with that and it might be a fire hazard if your bulbs get really hot.
If you have a bit more budget (100-200$), you can get a cheap softbox kit. I can’t advise because I haven’t taken that step yet. Just make sure it’s powerful enough for continuous video lighting; it’s different than still photography.
If you want to see great lighting in action, check out this moody video by Submotion Orchestra or this video by Adam Neely. The great thing about these is you can clearly see how they’re using lighting in each shot.
Directing the B-roll
If you’re having someone film B-roll for you, send them a general description of the types of shots your looking for. Concept art is really helpful for examples. Let them know if it should be tripod shots or handheld shots. I like the organic shakiness of handheld shots, in contrast to the tripod shots of musicians recording themselves. Also let them know what frame rate to film at. I like to film B-roll at a higher frame rate than the project timeline so I can smoothly slow it down. For a 24fps project, I normally do 30fps B-roll. For a 30fps project, 50fps B-roll would probably work well (but I haven’t tried it yet).
Some notes for if you’re filming the performance shots or B-roll yourself
For filming on a phone, my main tip is to experiment with really close angles. Lock the autofocus as close as it will go and just try moving around and looking at different stuff.
This is my checklist for filming on a DSLR:
- Set the frame rate/resolution
- Set the color temperature
- Set the exposure time (should be around half the frame rate, 180-degree shutter rule)
- Set the aperture (I love shallow focus so I normally just crank it as wide as it will go)
- Set the ISO. This is what I mainly use to control exposure
- Having a polarizing filter is really nice for outdoor filming. It reduces the brightness a bit, letting me keep the aperture wide open, and also lets me control glare.
I also recommend getting custom picture profiles (aka picture controls) for your DSLR. This is basically a guide for how the camera maps the raw sensor data into an image with an 8-bit color space. The stock settings on many DSLRs are suboptimal for shooting cinematic video, and you can find better options online. These are specific to camera manufacturers, so you have to look for profiles made for your camera’s manufacturer. For Canon cameras, I like to use Technicolor’s Cinestyle and John Hope’s Cinema picture styles.
Overall, I recommend just reading and watching lots of videos on filmmaking to learn all the details. There’s quite a bit that I can’t speak very competently to because I’m entirely self-taught with photography and do it all by feel.
3) Post-production
The final stage. After your big adventures out in the world collecting footage and B-roll, this is the part where you put it all together.
My process for editing a music video is:
- Lay out the focus/performance shots
- Lay out the B-roll shots
- Grids and lines
- Grading, FX, and overlays
Lay out the focus/performance shots
This step is about figuring out where you want the viewer’s focus to be at every moment in the video. I do this by just listening to the music. Whatever stands out to me musically at a given moment is what I’ll show on screen. If nothing jumps out at me, I’ll leave that spot blank initially and fill it in later with either B-roll or other performance shots that look cool.
This is also the stage for figuring out the editing rhythm. I don’t have any specific guidelines for this, but if you’re following the pace and focus of the music it normally works itself out. After you edit a section, watch the whole sequence and see if it feels right.
This Fox Capture Plan video is an example of a fast editing pace that fits the fast, energetic pace of the music. By contrast, this is a Mammal Hands video with slower and more regular cuts that fits the relaxed smooth and relaxed air of the song.
One note is that I like to avoid cutting too predictably/evenly. I don’t like to have sequences where I’m cutting on the downbeat of every bar. Instead, it will be more like: have the soloist on screen for 2-3 bars, then cut to the bass for this interesting fill they do, then back to the soloist for a bit, then switch to drums for this cool drum fill, then cut to the piano because they just changed up the comping pattern they were doing, etc.
Sometimes really short (1-2 frame) cuts to black in between clips can be an interesting effect for separating ideas (or hiding jump cuts). It’s something you feel more than see, so experiment with it.
Lay out the B-roll shots
This is the stage where you’re filling in everything around the focus clips, everything that we left blank before.
This is where you’re really creating the vibe of the video. It can be helpful to think, for each section, what mood you’re trying to convey. For example, in TOKYO DRIFT, the moods were:
- Dnb Vamps (0:04, 0:45): fast-paced, handheld, moving
- Melody (0:24): ambient, city lights, mellow
- Buildups (1:05, 3:34): long, mellow, colorful
- Choruses (1:27, 3:13): bright, big, wide, open
- Synth vamp (4:01): lush, lost in another world
You’ll have a lot of options in this stage with all the different performance and B-roll shots available. I like to just get something down quickly and then revise if it doesn’t feel right.
Grids and lines
This is the stage where you’re tightening everything up. Laying out the grids and lines for the splitscreens, adjusting the fine placement of cuts, making sure all the sequences flow well and all of the clips look good.
I do my gridding by just using black lines that I made in GIMP and adjusting their position and cropping in Resolve. Other programs probably have better ways to do splitscreens.
Grading, FX, and overlays
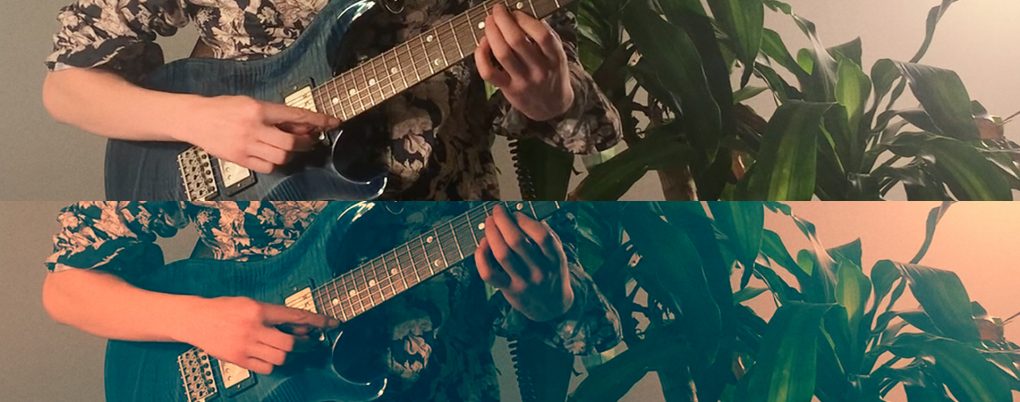
My general goal with grading is to bring out the colors of a shot and make it fit nicely with the surrounding shots. The process is:
- Denoise (if necessary)
- Set brightness and contrast
- Set color temperature, adjust color casts
- Set saturation
- Apply “creative grading”
- Sharpen (if necessary)
Here are a couple walkthroughs to see it in action:
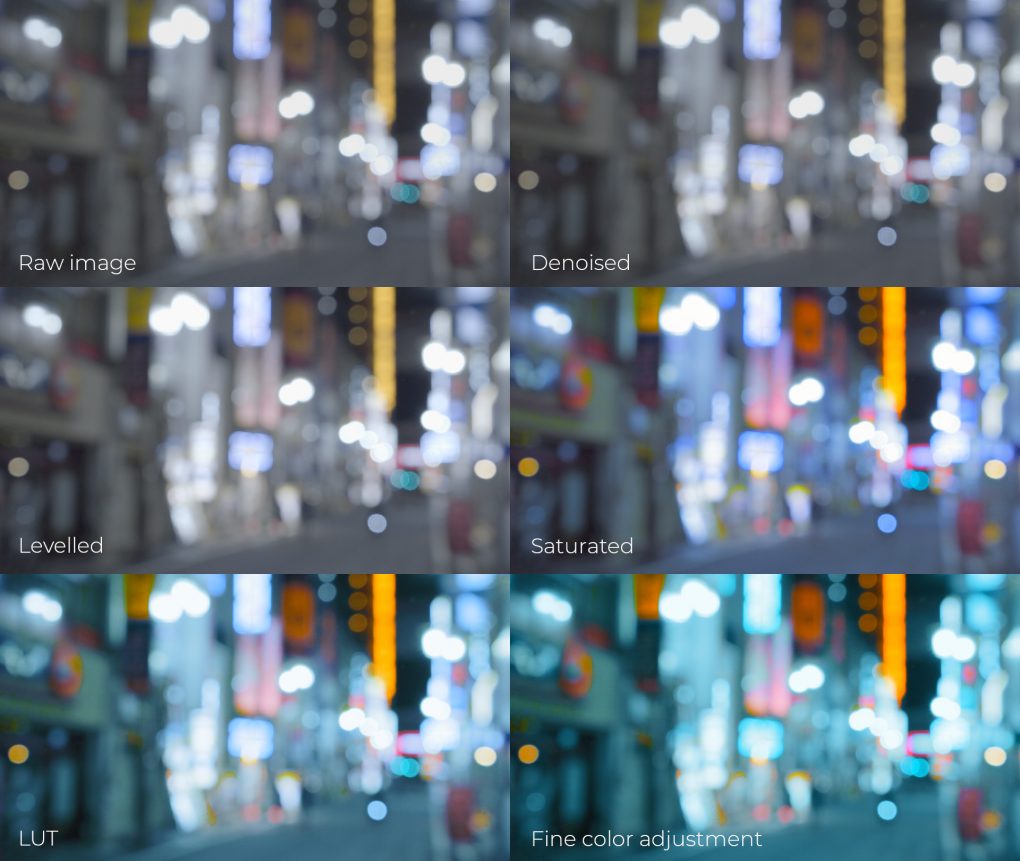
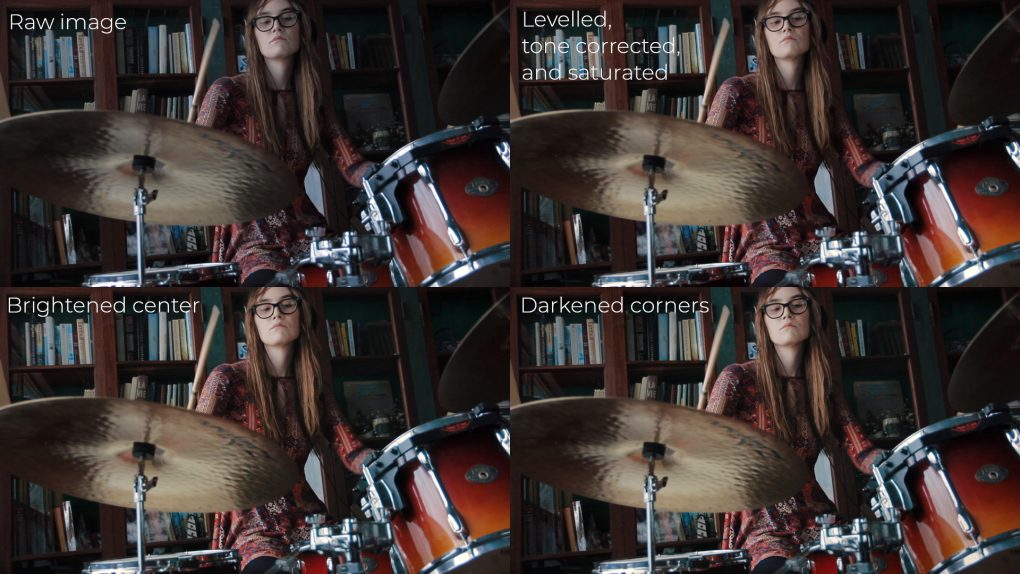
I started this grade by denoising and deflickering with Neat Video (highly recommended if you have a noisy camera). Then I added some contrast by raising the gain and lowering the lift. The RGB Parade scope is really useful during this step so I can make sure I’m not clipping the highlights or shadows. I also raised the gamma a bit to get a good overall brightness in the image. I generally want waveform on the scope to be roughly centered around the 50% brightness mark (but it depends on the shot).

This clip was already excellently white balanced and free of color casts, so I didn’t have to adjust that at all.
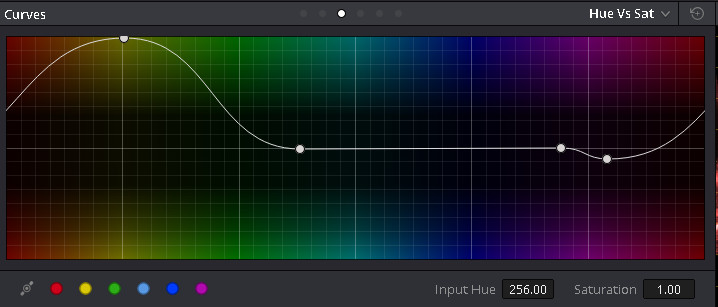
I used a combination of the Sat and Col boost controls to bring out the colors. The Sat control scales the saturation of all colors linearly. Col boost is a bit more complicated, but it generally brings out the color in less saturated parts of the image without oversaturating the rest of the image. It’s worth playing with both of these controls to get a feel for how they interact. I also used the Hue vs Sat curve to push the saturation of the yellow/orange tones even further.
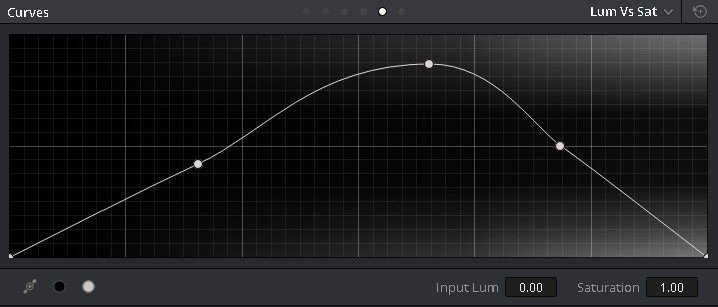
Then I used the Lum vs Sat curve to push the saturation in the midtones while desaturating the shadows and highlights. This is a good trick that can keep your images from looking unnatural when you push the saturation really hard.
Next, I used the C-9730 LUT from the IWLTBAP Free Cinematic LUTs pack at around half strength to smooth over the colors and create a nice orange-teal look. You can see in the example that it added a lot of cohesion to the color scheme.
Lastly, I did some fine color work: pushing the Sat and Col Boost even more and then using the Hue vs Hue curve to push the blues more teal and the reds more orange.
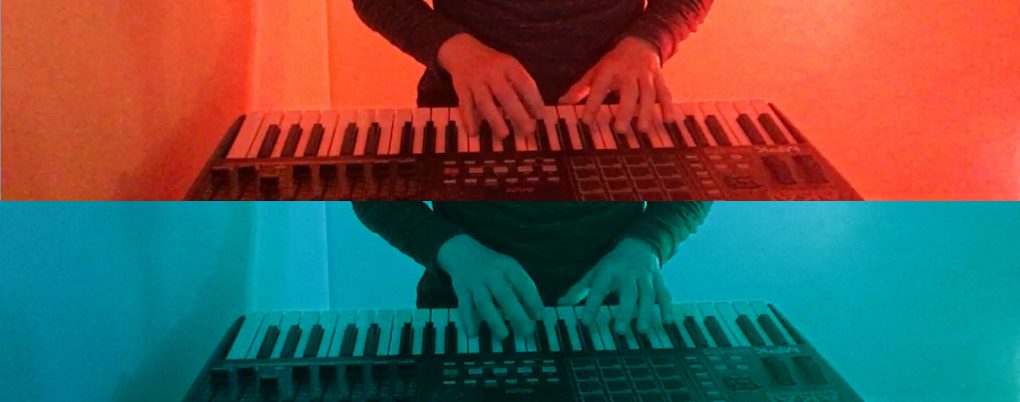
This one is a much more subtle grade. The raw shot was a bit dark so I brightened it. Then I increased the color temperature slightly and pushed the colors with Col Boost.
This next piece is a handy trick: in Resolve, you can define Windows to limit what part of the image a node will affect. I created a fuzzy oval window in the center of the image so that I could brighten myself without affecting the rest of the image. This helps emphasize me as the focal point of the frame.
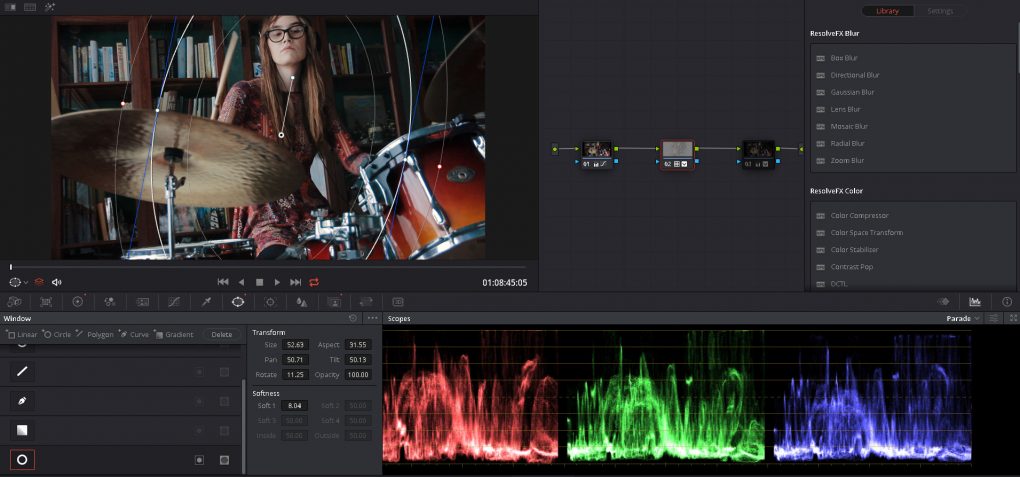
And lastly, I made another node with fuzzy windows on the top-left and bottom-right corners of the frame to selectively darken these areas. Again, this helps draw the focus to the center of the frame.
So those are just two examples, but grading is a huge topic that I am not nearly qualified to write a comprehensive guide on. There are plenty of good articles and videos to check out if you want to learn more.
FX and overlays are another big topic and I don’t have a lot to say about them. I didn’t use them very much in these videos and I’m only just starting to really dive into this realm. What I’ve discovered so far is this: FX and overlays can add a lot of polish and visual intrigue when used well, but it’s also easy to end up looking really corny. Proceed with caution, and check out some Fox Capture Plan videos.
And in conclusion
You’re now ready to go out into the world and make some videos. Have fun, stay safe, and thanks for reading!
I am a Columbus-based drummer, composer, and video artist. If you liked this post, consider checking out some of my other work!